Romano Zambon Guitar Build
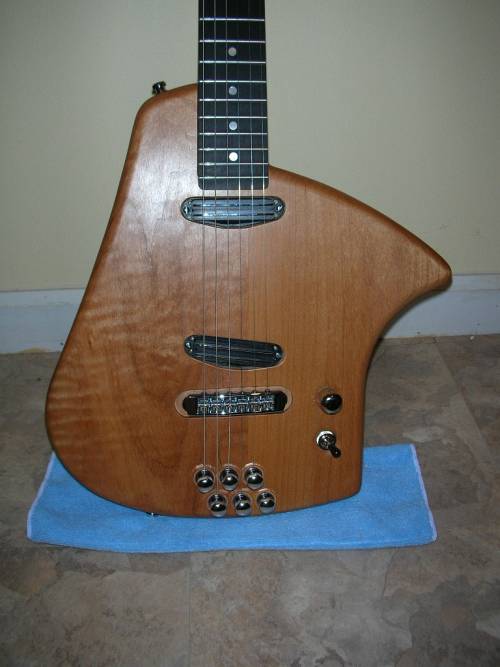
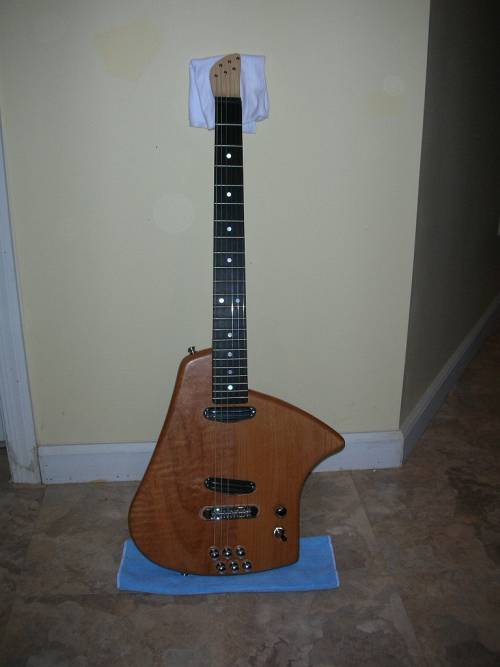
This electric guitar build comes by way of Romano Zambon, a long time BTEG reader. Romano took on this project based on his review of Scott French’s bridge and headpiece solution and his interest in building an ergonomic instrument.

Thinking out the Guitar Build
We begin with Romano talking us through considerations leading up to building his guitar:
I came across your site about a year ago and was intrigued by the Klein guitar. I remember them from the 80’s but did not give them much thought at the time.
Clearly trying out a Klein today is not an option so I started to do some research and decided it may be feasible for me to build my own body. I thought about going the Steinberger route for parts but I really dislike the skinny necks and I wanted to be able to use regular strings. Then I saw the Scott French design and felt that was a very elegant solution.
My original idea was to marry the Klein shape to the Scott French bridge/headpiece solution. I did not necessarily want to copy it verbatim but I did use it as a starting point. So I began making cardboard mockups. The first thing I noticed is that the Klein was really WIDE and the upper bout actually got in my way. I modified the bout and removed some more material where the body contacted my ribcage. I also wanted to keep the width just below 14″ so I could use an off-the-shelf alder guitar blank.
Preparation for Making the Guitar Body
Romano then set out preparing for the actual work which included studying the process of building a guitar, buying tools and coming up with templates:
I read your build guide and Building Electric Guitars by Martin Koch. Now I had to buy tools ($$$) and I ended up getting the same Dewalt router (nice router BTW). However I simply did not have room for a bandsaw so I had to make due with a jigsaw.
After about a dozen cardboard mockups I built a set of templates out of 1/4″ MDF and then used those to route out working templates from 3/4″ MDF. I first tried building a “practice body” out of some cheaper pine and I am glad I did as I would have ruined the alder. After that I made some changes to the template and my technique and started on the alder blank. It took a few weeks as I could not work on it every night.

The Guitar Neck
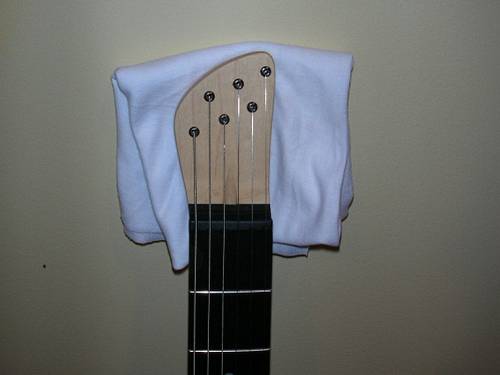
Because thinner necks like the Steinberger’s cramp his hands, he chose a USA Custom Guitars 25.5″ scale neck, .860″ thick at the first fret with a 1 11/16″ nut width. A paddle headstock gave him the necessary material to shape as needed.

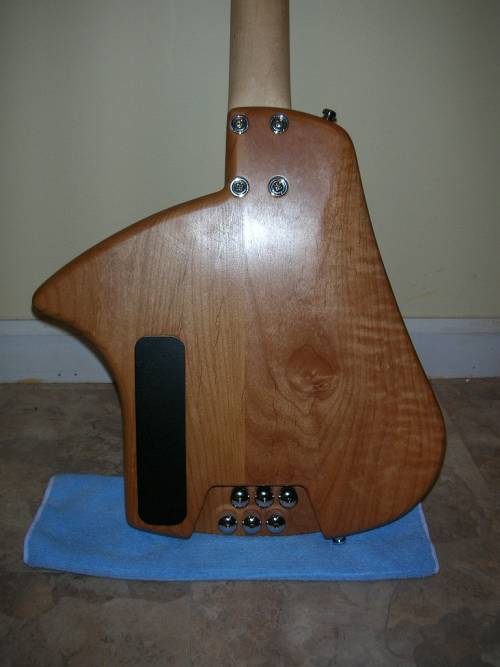
He prepared the conventional neck for “headless” use by cutting out the mini headstock and pressing string through ferrules through both sides. The neck was also converted to a true bolt on neck with the use of 10-32 stainless inserts and bolts. A Schaller TOM bridge and body mounted Steinberger tuners completed the headless tuning solution.
Finishing the Guitar
Everything was finished with Minwax Wipe On Poly – an idea he got from builders over at the Telecaster Guitar Forum. Romano commented that “it goes on easy, no streaks or runs and I get a really nice smooth satin finish. Best part is it is the simplest finish I have ever done.”

Electronics
GFS blade pickups from Guitarfetish.com were put to the task – GFS Lil Killer bridge (15K) and neck (6K) Strat rails. Preferring the sound of single coils over humbuckers, he finds these give him that “Fender snap with slightly fuller, warmer tone.”
A nice touch is the .040″ steel control cavity cover plate held in place by 1/4″ magnets in the body. This setup “worked out really well as it’s easier to pop the cover off and I don’t have to deal with unsightly screws.”
Results
Romano tells me he’s “very happy with how it came out. I had very little woodworking experience and this was the first time I used a router.” And after only a few days of playing, “it has become my favorite. Now when I pick up my Telecaster it feels alien to me (It’s getting jealous). I have not weighed it yet but it is considerably lighter than my Tele.”
He plans to play it for 6-12 months before turning his sights on his next guitar project for which he already has ideas for improvement.
Wow, great job Romano! And thanks for so much detail in the write-up. This mini-headstock-with-ferrules approach seems very accessible, and the Steinberger tuners are too.
Buy a neck with a nut already installed and a side-adjust truss rod, mount the bridge at the right spot, get the neck/body joint correct, and you have all the tricky bits solved.
This is a great example of how (relatively) simple it can be. Of course, I’m still on the fence for trying… but I want to!
Straightforward and effective. Magnets for the control cover is a simple and practical touch. Very nice, Romano.
An open question to BTEG readers…
I’ve ordered, tried, and returned three sets of Steinberger tuners so far. The consistent issue I’ve found is E strings (.009 or .010) get lodged in the internal clamping lever mechanism — between the clamp and tuner wall — jamming the tuner and rendering it inoperable. It looks as if the issue could be fixed with tighter machining tolerances.
…has anyone else encountered this problem?
I think I know what you mean about the Steinberger tuners. I am using a .010 for E and I had to really clamp down hard to get it to hold. It was an interesting approach in trying to get away from the Steinberger headless bridge however it is a bit of a pain to tune since you need turn them on the backside of the body. I am currently looking at using the ABM system for a future build. Problem is that there is no information online about them so I took the gamble and ordered a set. If anyone is interested I am putting together some drawings & detailed photos so we at least have some more info on them…
Thanks for the info on the Steinberger tuners – bummer.
Chris Forshage uses ABM tuners… I haven’t heard anybody discuss this, but I find the knurled tuning knobs to be a real pain. Tuning strings up to pitch, particularly the trebles, can be a literally painful experience as there is a great deal of resistance when turning the knobs. The metal digs into one’s fingers.
I can’t figure out how to adjust them to avoid this. You’ll have to let me know if you agree.
I had not heard that about using ABM tuners before. On my homebuilt I found going from course threads to really fine threads on the tuners made them much, much easier on the fingers. Perhaps ABM, being a smaller manufacturer, would allow customers to specify a finer thread pitch in their machines?
Well, my ABMs both on Klein replica guitar and Bass is easy to turn. On the bass they’re even more easy than o n the Stenberger bridge.
Some individual string bridges are notched in the tuning gear allowing for larger knobs. So that every other knob is placed “under” or “over” neighboring ones, in order to get a full grip of it, so the adjacent tuning knob does not get in the way. It’s easily solved with just having much longer posts on half of them. On guitar it is a problem since using the more narrower string width can cause problems with knobs bumping into each other.
That really came out Very nice !!! One might suggest a little neck angle and you won’t have to recess the Bridge …and if you make the guitar body flat(ish’)across the bottom , it will stand(lean) by itself..and even use regular tuners with a slight modification … You can see what I mean on my website/Lobster Guitar..