Guitar Belly Contour and Forearm Cut Complete

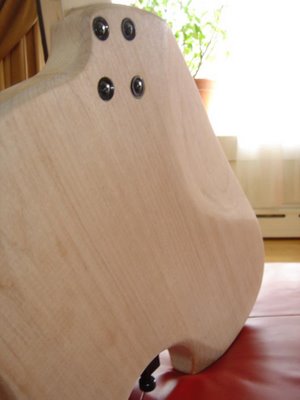
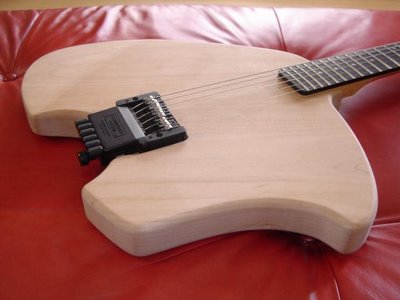
The electric guitar build is proceeding well – the forearm cut and belly contour are complete. In addition, the angled lower strap button area is done.
For the belly contour I used a combination of an 80 grit sanding disc on an electric drill to take away the bulk of the material followed by hand sanding to smooth it out and round over the edges. A number of builders use an angle grinder to achieve the same effect. However, not being experienced with one, I opted for a slower approach.
For the forearm cut, I clamped a straight piece of wood at an appropriate spot so that I wouldn’t sand too far into the face of the guitar. Then I used the sanding disc and hand sanding to complete the task.

Note that finish sanding remains.
More on my first guitar project:
Guitar Build – Neck and Steinberger Bridge in Place for First Test!
Guitar Build – Neck Pocket Complete
Guitar Build – Bridge and Neck Have Arrived
Guitar Build – Guitar Body Flush Trimmed and Edges Rounded Over
Cutting Out The Ergonomic Guitar
Making The Ergonomic Guitar Template
Project Guitar Topic Thread: First Project Attempt – Ergonomic Guitar
It’s a really professional-looking build. Are you sure you want to use pickups you’ve got lying about going spare? I reckon this would deserve some more carefully chose units.
GL – Thanks for saying so! Its my first build so I’m just happy that its functional – last week with the bridge and neck mounted and it strung up, proved that much. The fact that it generally looks good is a plus. 🙂
However, it has a couple of blemishes. I’m new to woodworking as well and I’m learning almost everything as I go along. Honestly, the few blemishes could be hidden under a coat of paint (as I imagine many factory guitars are built) but I’ll probably go with a simple finish for this one. Again, I’m happy its functional and I’ll just think of the blemishes as hard earned bumps and bruises.
The pickups I have are Lace Sensors that once belonged to a Strat Plus. I liked the sound of that guitar so I’ll give them a go on this build. My next build will be about learning from my experiences, avoiding the aesthetic nits and exploring greater tonal variety in the instrument. I’m thinking a combination of humbuckers, coil splitting and piezo pickups is in order. That said, I’d love to hear recommendations…
I’m surprised you didn’t use the fourinhand file to carve the curves out first before resorting to the sander. How long did this take? Were you happy with the control over the removal of material?
Hi Matt: Thanks for stopping in. I read about a few different approaches on Project Guitar Forum. Some used mostly hand tools while others resorted to angle grinders. I tried both approaches and opted for a third – a sanding disc on an electric drill. Of the three approaches, I thought this one had the best combination of speed and control. The rasp was a bit too slow and the angle grinder took away too much material. The sanding disc, with a coarse grit, let me control the rate of removal so I could switch from removing a lot to removing a little. As far as time is concerned, I’d be hard pressed to say. I accomplished the bulk of the work in the course of a couple of hours. This is my first attempt at anything like this so I spent some time on it. I took away some, checked, took away a bit more, checked again, etc. After I was satisfied with the general results, and had the neck and bridge back on, I strung up the guitar and lived with it for a week. This gave me the opportunity to check out the contours. I went back and spent probably another hour or so on them. Now that I have a better feel for the tools, the next one should go a bit faster.
Wow, looking great! I can’t wait to see what it looks like with the rest of the hardware. All that wood is looking so naked…
but sweeeeet….
As for pickups, I have to admit I’m jonesing for the Lace Alumitones, which will probably make the cut if and when I ever get around to my own headless build.
Lace doesn’t seem to make it easy to have their PS-900 in the neck, and a ‘bucker in the bridge, though. If it comes time… some day… I’ll probably see if I can get in touch with a Lace tech to see what’s up with what’s down.
Keep up the great work, Robert!
Hi GregP – Good to see you and thanks for the comments. After the pickup routes and control cavity are done, I can start to finish it. At this point, I’m going with a relatively simple finish – Danish Oil. Danish Oil is straightforward to apply and will provide adequate protection. On my test scraps, it imparts a nice amber tone to the alder. Combined with the black hardware (bridge, volume knob and pickup switch) it should look good.
I can smell the wood just looking at those photos! Mmmmmmmh!
Nice work Robert!!
Stratocat – LOL. Thanks! The control Cavity is up next.
Hey man, how did you get Yahoo! to approve you for ads?
– Scott
Hey Scott: I applied to an invitation Yahoo Ads sent me. At the time it was still in beta. Why I was chosen to receive an invitation I’m not sure.
Hi Robert, wow its really coming along. Nice work!
Hi Mammoth Guitars – Thanks! I appreciate the comments. I’m pleasantly surprised that things have come along so well. I’ve had a few mishaps here and there but everything is functional so I’m not concerned about any small aesthetic issues. I’ll just consider them battle scars. 🙂 As you may recall, it is my first guitar build so I’m happy with the progress. That said, I am planning a couple of new ones but haven’t made any final determinations just yet. For one, I’m still debating whether this next build will include my first neck build.